Love this? Save it for later!
Share the inspiration with your friends
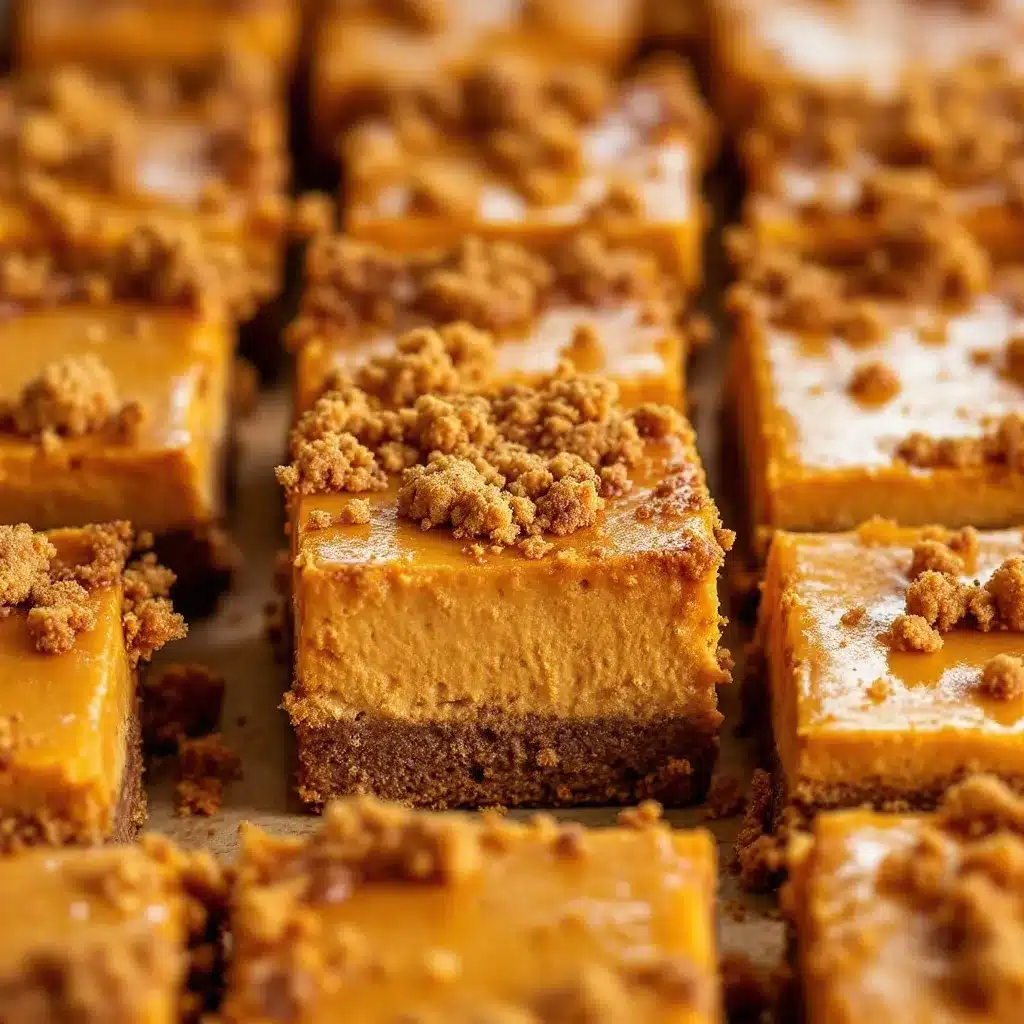
I want these pumpkin cheesecake bars right now and I have everything except a gingersnap crust that actually holds together. That’s the thought that hit me at 7:42 PM on a Tuesday, standing in front of my pantry with the door open, staring at a box of gingersnaps I’d bought on a whim two weeks ago. The pumpkin puree was already sitting on the counter, the cream cheese was softening, and I had this specific vision of a bar that’s creamy on top, crunchy on the bottom, and tastes like autumn in a single bite. Not a pumpkin pie, not a cheesecake, but something in between that you can pick up with your hands and eat standing over the sink if you want to.
The thing about pumpkin desserts is they can be heavy. Too dense, too sweet, too much going on. I wanted something that felt light despite being rich, if that makes sense. And I knew the gingersnaps would do the heavy lifting—that warm, spicy crunch that cuts through the cream cheese and pumpkin like a sharp little note in a symphony. But I’d made crusts before that crumbled into sad little piles on the plate. Not this time.
So I grabbed the butter, the molasses, the spices, and I started testing. First batch? Too soft. Second batch? Better, but the crust needed more structure. Third time was the charm, and honestly, I almost ate the entire pan before I could photograph it. That’s how you know a recipe is good—when you’re sneak-cutting corners off the pan at 10 PM in your pajamas.
These bars became my fall secret weapon. They show up at Friendsgiving, they disappear at office potlucks, and they make people who say “I’m not really a pumpkin person” take a second look. I’m not here to sell you on another pumpkin recipe. I’m here to tell you that this one actually works, and it works because of a crust that finally stays put.
Why You’ll Love This Recipe
I’ve tested this recipe more times than I care to admit, and every single time, the same thing happens. Someone takes a bite, pauses, and says, “Wait, what’s in the crust?” That gingersnap moment is real, and it’s the reason I keep coming back to this version over and over.
- Quick & Easy: From start to fridge, you’re looking at about 45 minutes of active time. The oven does the rest, and then you just wait. (Waiting is the hard part, honestly.)
- Simple Ingredients: Cream cheese, pumpkin puree, eggs, sugar, spices, and a box of gingersnaps. Nothing fancy, nothing you have to hunt down at three different stores.
- Perfect for Fall Gatherings: These bars travel well, slice cleanly, and don’t need any fancy plating. Bring them to a potluck and watch them vanish.
- Crowd-Pleaser: I’ve served these to kids, grandparents, and everyone in between. The texture hits that sweet spot between pumpkin pie and cheesecake, and the crust adds just enough crunch to keep things interesting.
- Unbelievably Delicious: The first time I made these, I ate three bars in one sitting. Not my proudest moment, but it tells you everything you need to know.
What sets these bars apart from every other pumpkin cheesecake recipe out there is the crust. Most recipes use graham crackers, which are fine, but fine isn’t what we’re after. Gingersnaps bring a deep, molasses-y warmth that plays off the pumpkin and cream cheese in a way that feels intentional. It’s not just a crust—it’s a flavor foundation. Plus, I’ve figured out the exact butter-to-crumb ratio that keeps the crust from crumbling or getting soggy. No more crust failures on my watch.
This is the kind of dessert that makes you close your eyes after the first bite. It’s comfort food reimagined—familiar enough to feel nostalgic, but different enough to feel special. And honestly? It’s perfect for those nights when you want to impress someone without breaking a sweat.
What Ingredients You Will Need
This recipe uses simple, wholesome ingredients that come together to create something genuinely special. Most of these are pantry staples, especially if you’re a fall baking enthusiast like me.
For the Gingersnap Crust:
- 2 cups (about 200g) gingersnap cookie crumbs (I prefer Nabisco or a bakery brand for the best spice kick)
- 5 tablespoons (70g) unsalted butter, melted
- 2 tablespoons (25g) granulated sugar
- 1/4 teaspoon salt (trust me on this—it balances the sweetness)
For the Pumpkin Cheesecake Filling:
- 16 ounces (450g) cream cheese, softened to room temperature (full-fat is best here, but reduced-fat works in a pinch)
- 3/4 cup (150g) granulated sugar
- 1/4 cup (50g) light brown sugar, packed
- 3 large eggs, room temperature
- 1 cup (245g) pumpkin puree (not pumpkin pie filling—check the label)
- 1/4 cup (60ml) sour cream, room temperature (adds tang and creaminess)
- 1 teaspoon vanilla extract
- 1 1/2 teaspoons pumpkin pie spice (or make your own with cinnamon, nutmeg, ginger, and cloves)
- 1/2 teaspoon ground cinnamon
- 1/4 teaspoon salt
For the Optional Topping:
- 1/2 cup (120ml) heavy cream
- 1 tablespoon powdered sugar
- 1/4 teaspoon vanilla extract
- Caramel sauce for drizzling (store-bought is fine, or make your own)
A few notes on ingredient selection. For the gingersnaps, look for cookies that are firm and snappy, not soft. The crunchier they are, the better your crust will hold. I’ve tried this with store-brand gingersnaps and with a fancy bakery version, and honestly, the regular ones work just fine. For the cream cheese, I recommend Philadelphia—it’s consistent and gives the smoothest texture. Let it sit out for at least an hour before you start mixing. Cold cream cheese leads to lumps, and nobody wants lumpy cheesecake bars.
If you’re dairy-free, you can substitute the cream cheese with a good quality plant-based version, and use coconut cream instead of sour cream. The texture will be slightly different, but still delicious. For a gluten-free option, use gluten-free gingersnaps or substitute with gluten-free graham crackers and add an extra teaspoon of ground ginger and cinnamon to mimic that gingersnap flavor.
Equipment Needed
You don’t need a professional bakery setup for these bars, but a few key tools will make your life easier. I’ve made these in multiple kitchens, and here’s what I’ve found works best.
- 9×9-inch baking pan (an 8×8 works too, but the bars will be slightly thicker and may need a few extra minutes of baking time)
- Food processor or zip-top bag and rolling pin (for crushing the gingersnaps into fine crumbs—I prefer the food processor for consistency)
- Electric hand mixer or stand mixer (you can do this by hand with a whisk, but your arm will thank you for using a mixer)
- Large mixing bowls (one for the crust, one for the filling)
- Parchment paper (non-negotiable—it makes lifting the bars out of the pan so much easier)
- Measuring cups and spoons
- Rubber spatula
- Offset spatula (optional, but great for smoothing the top of the cheesecake filling)
If you don’t have a food processor, no worries. Put the gingersnaps in a sturdy zip-top bag, seal it, and go to town with a rolling pin. It’s a little therapeutic, honestly. Just make sure the crumbs are fine and uniform—big chunks will make the crust uneven.
I’ve made these bars in both metal and glass baking pans, and I prefer metal. Glass can hold heat longer, which sometimes leads to overbaked edges. If you use glass, check the bars a few minutes early. And please, for the love of all things pumpkin, line your pan with parchment paper. Leave some overhang on two sides so you can lift the whole block out cleanly. Future you will be very grateful.
Preparation Method
Let’s get into the actual making of these bars. I’ve broken this down into clear steps with all the little details I wish someone had told me the first time I made them.
Step 1: Prep Your Pan and Preheat
Preheat your oven to 350°F (175°C). Line your 9×9-inch baking pan with parchment paper, leaving a 2-inch overhang on two opposite sides. This creates handles for lifting the bars out later. Lightly spray the parchment with non-stick cooking spray, just to be safe.
Step 2: Make the Gingersnap Crust
Pulse the gingersnaps in a food processor until you have fine, uniform crumbs. You should have about 2 cups. Transfer to a medium bowl, add the sugar and salt, and stir to combine. Pour the melted butter over the crumb mixture and stir with a fork until every crumb is moistened. It should look like wet sand and clump together when you squeeze it.
Press the mixture firmly into the prepared pan. I use the bottom of a measuring cup to really pack it down—this is crucial for a crust that doesn’t crumble. Press it evenly across the bottom and about 1/4 inch up the sides. Bake for 10 minutes at 350°F (175°C). The crust should be fragrant and just starting to darken at the edges. Set it aside to cool while you make the filling. Don’t turn off the oven.
Step 3: Make the Pumpkin Cheesecake Filling
In a large mixing bowl, beat the softened cream cheese with an electric mixer on medium speed until smooth and creamy, about 2 minutes. Scrape down the sides and bottom of the bowl with a rubber spatula. Add the granulated sugar and brown sugar, and beat until well combined, another 2 minutes. The mixture should be light and fluffy.
Add the eggs one at a time, beating on low speed after each addition until just combined. Overmixing at this stage can incorporate too much air, which leads to cracks in the finished bars. I know it’s tempting to keep mixing, but stop as soon as the yolk disappears.
Add the pumpkin puree, sour cream, and vanilla extract. Beat on low speed until smooth and uniform. The mixture will look a little looser than a standard cheesecake batter—that’s normal. Add the pumpkin pie spice, cinnamon, and salt, and mix until just combined. Give it one final scrape with the spatula to make sure everything is incorporated.
Step 4: Assemble and Bake
Pour the filling over the pre-baked crust. Use an offset spatula or the back of a spoon to spread it evenly to the edges. Tap the pan gently on the counter a few times to release any air bubbles.
Bake at 350°F (175°C) for 35-40 minutes. The edges should be set and slightly puffed, but the center should still jiggle slightly when you gently shake the pan. This is the sweet spot—overbaking leads to dry, cracked cheesecake. If you’re unsure, err on the side of underdone. The residual heat will continue to cook the bars as they cool.
Step 5: Cool and Chill
Place the pan on a wire rack and let it cool to room temperature, about 1 hour. Don’t rush this step. If you put warm cheesecake in the fridge, condensation will form on the surface and make it watery. Once it’s cool, cover the pan with plastic wrap and refrigerate for at least 4 hours, but overnight is better. This is the hardest part of the recipe, I know. But the bars need this time to set properly and develop their full flavor.
Step 6: Slice and Serve
When you’re ready to serve, lift the bars out of the pan using the parchment handles. Place on a cutting board and use a sharp knife to slice into 16 squares (4 rows by 4 rows). For clean slices, wipe the knife clean between each cut. I run the knife under hot water and dry it off before each slice—it makes a huge difference.
If you’re adding the whipped cream topping, whip the heavy cream, powdered sugar, and vanilla together until soft peaks form. Dollop or pipe onto each bar, and drizzle with caramel sauce if desired.
Cooking Tips & Techniques
I’ve made these pumpkin cheesecake bars more times than I can count, and I’ve learned a few things the hard way. Here’s what I wish I’d known from the start.
Room temperature ingredients matter. I know it’s annoying to plan ahead, but cold cream cheese and cold eggs will give you a lumpy batter. Set everything out on the counter an hour before you start. If you’re in a rush, you can microwave the cream cheese in 10-second bursts, but be careful—melted cream cheese is a whole different problem.
Don’t overbeat the eggs. This is the number one cause of cracks in cheesecake. Beat on low speed and stop as soon as the egg is incorporated. You’re not trying to whip air into the batter—you’re just combining ingredients.
The water bath debate. Some recipes swear by a water bath for cheesecake, but I don’t use one for these bars. The shallow pan and shorter baking time mean they cook evenly without one. Just don’t overbake them and you’ll be fine.
Check your pumpkin puree. Make sure you’re using 100% pumpkin puree, not pumpkin pie filling. The pie filling has added sugar and spices that will throw off the balance of this recipe. I made that mistake once, and the bars were way too sweet and the texture was off.
Let them chill fully. I know it’s tempting to sneak a slice after an hour in the fridge, but the bars need at least 4 hours to set properly. Overnight is ideal. The flavor actually deepens as they chill, and the texture becomes silky and smooth. Patience pays off here.
Variations & Adaptations
One of the best things about this recipe is how adaptable it is. I’ve played around with different versions, and here are some of my favorites.
Gluten-Free Version: Swap the gingersnaps for gluten-free gingersnaps or gluten-free graham crackers. If you use graham crackers, add an extra teaspoon of ground ginger and 1/2 teaspoon of ground cloves to the crust to mimic that gingersnap warmth. Everything else in the recipe stays the same.
Dairy-Free Version: Use a high-quality dairy-free cream cheese (I like Kite Hill or Violife) and substitute the sour cream with full-fat coconut cream. Use a plant-based butter for the crust. The texture will be slightly less firm, but still delicious. Just make sure everything is at room temperature before mixing.
Maple Pumpkin Version: Replace the granulated sugar in the filling with 1/2 cup maple syrup and reduce the sour cream to 2 tablespoons to account for the extra liquid. Add 1/4 teaspoon of maple extract for a deeper maple flavor. This version pairs beautifully with the brown butter maple snickerdoodles I make every fall.
Chocolate-Gingersnap Version: Add 1/4 cup of melted dark chocolate to the cheesecake filling along with the pumpkin. Swirl it in gently with a knife for a marbled effect. The chocolate and ginger are a surprisingly good combination.
Mini Bar Version: Press the crust into a mini muffin tin (lined with paper liners) and fill with the cheesecake mixture. Bake for 15-18 minutes at 350°F (175°C). These are perfect for parties or holiday cookie exchanges.
I’ve also tried adding a layer of pumpkin cream cheese swirl on top of these bars, and honestly, it’s a game-changer. Just set aside a few tablespoons of the filling before adding the pumpkin, and dollop it on top before baking. Swirl with a knife for a beautiful presentation.
Serving & Storage Suggestions
These pumpkin cheesecake bars are versatile enough for any occasion. Here’s how I like to serve and store them.
Serving: Serve the bars cold or at room temperature. I prefer them straight from the fridge—the texture is firmer and the flavors are more pronounced. If you’re serving them at a party, let them sit out for about 15 minutes before slicing. This takes the chill off without making them too soft.
For presentation, I love adding a dollop of whipped cream and a drizzle of caramel sauce. A sprinkle of cinnamon or a few candied pecans on top adds a nice crunch. These bars also pair beautifully with a cup of hot coffee or a glass of cold milk. If you’re serving them as part of a fall dessert spread, they go great alongside apple cider glazed bundt cake or skillet peach crisp for a full autumn dessert table.
Storage: Store the bars in an airtight container in the refrigerator for up to 5 days. Layer them with parchment paper between slices to prevent sticking. I’ve found that the flavor actually improves after a day or two in the fridge—the spices meld together and the texture becomes even creamier.
Freezing: These bars freeze beautifully. Wrap individual slices tightly in plastic wrap, then place them in a freezer-safe bag or container. They’ll keep for up to 3 months. When you’re ready to eat one, thaw it in the refrigerator overnight. Don’t thaw at room temperature—the texture can become watery.
Reheating: I don’t recommend reheating these bars. They’re meant to be served cold or at room temperature. If you want a warm pumpkin dessert, try this same filling baked in a ramekin without the crust for a quick pumpkin custard.
Nutritional Information & Benefits
Let’s be real—these are a treat, not a health food. But there are a few redeeming qualities worth mentioning.
| Nutrient | Per Serving (1 bar) |
|---|---|
| Calories | 285 |
| Total Fat | 18g |
| Saturated Fat | 10g |
| Cholesterol | 75mg |
| Sodium | 220mg |
| Total Carbohydrates | 28g |
| Dietary Fiber | 1g |
| Sugars | 20g |
| Protein | 5g |
| Vitamin A | 45% DV |
| Calcium | 6% DV |
| Iron | 8% DV |
Pumpkin is packed with vitamin A, which is great for eye health and immune function. It’s also a good source of fiber and antioxidants. The cream cheese adds calcium and protein, though yes, it also adds fat. If you’re looking to lighten things up, you can use reduced-fat cream cheese and skip the whipped cream topping. But honestly? These bars are meant to be indulged in. One bar is perfectly satisfying, and a little goes a long way.
These bars are vegetarian and can be made gluten-free and dairy-free with the substitutions mentioned earlier. They do contain eggs and dairy in their standard form, so keep that in mind for guests with allergies.
Conclusion
These pumpkin cheesecake bars with gingersnap crust have become my go-to fall dessert for a reason. They’re simple enough for a Tuesday night baking session but impressive enough for a holiday table. The crust stays crunchy, the filling is silky smooth, and the whole thing tastes like autumn in bar form.
I love that this recipe is forgiving—you can swap ingredients, adjust the spices, and it still turns out beautifully. It’s the kind of recipe you’ll come back to year after year, tweaking it slightly each time until it feels like your own. That’s the beauty of a good base recipe.
If you make these bars, I’d love to hear about it. Leave a comment below and tell me how they turned out, what variations you tried, or if you ate three in one sitting like I did. No judgment here. And if you’re looking for more fall baking inspiration, check out the brown butter zucchini bread or the brown butter chocolate chip cookies—both are perfect for this time of year.
Happy baking, friends. May your crusts be crunchy and your cheesecake bars be perfectly jiggly.
Frequently Asked Questions
Can I use canned pumpkin pie filling instead of pumpkin puree?
No, I wouldn’t recommend it. Pumpkin pie filling already has sugar and spices added, which will throw off the balance of this recipe. Stick with 100% pumpkin puree for the best results. If you accidentally bought pie filling, you can still use it, but reduce the sugar in the recipe by half and skip the added spices.
Why did my cheesecake bars crack on top?
Cracks usually happen from overbaking or overmixing the batter. Make sure you’re not beating the eggs too vigorously—mix on low speed until just combined. Also, pull the bars out of the oven when the center still jiggles slightly. They’ll continue to set as they cool. If cracks do appear, don’t worry—the whipped cream topping hides them beautifully.
Can I make these bars ahead of time?
Absolutely. In fact, I prefer making them a day ahead. The flavors meld together and the texture becomes even creamier after an overnight chill. Just keep them covered in the refrigerator and add any toppings right before serving.
How do I get clean slices without the crust crumbling?
Use a sharp knife and wipe it clean between each cut. I like to run the knife under hot water and dry it off before each slice. Make sure the bars are fully chilled—at least 4 hours, preferably overnight. A warm bar will crumble and smush. Also, pressing the crust firmly into the pan before baking makes a big difference.
Can I freeze these pumpkin cheesecake bars?
Yes! Wrap individual slices tightly in plastic wrap, then place them in a freezer-safe bag or container. They’ll keep for up to 3 months. Thaw in the refrigerator overnight before serving. Don’t thaw at room temperature, as the texture can become watery. I like keeping a few slices in the freezer for those random fall cravings.
Pin This Recipe!
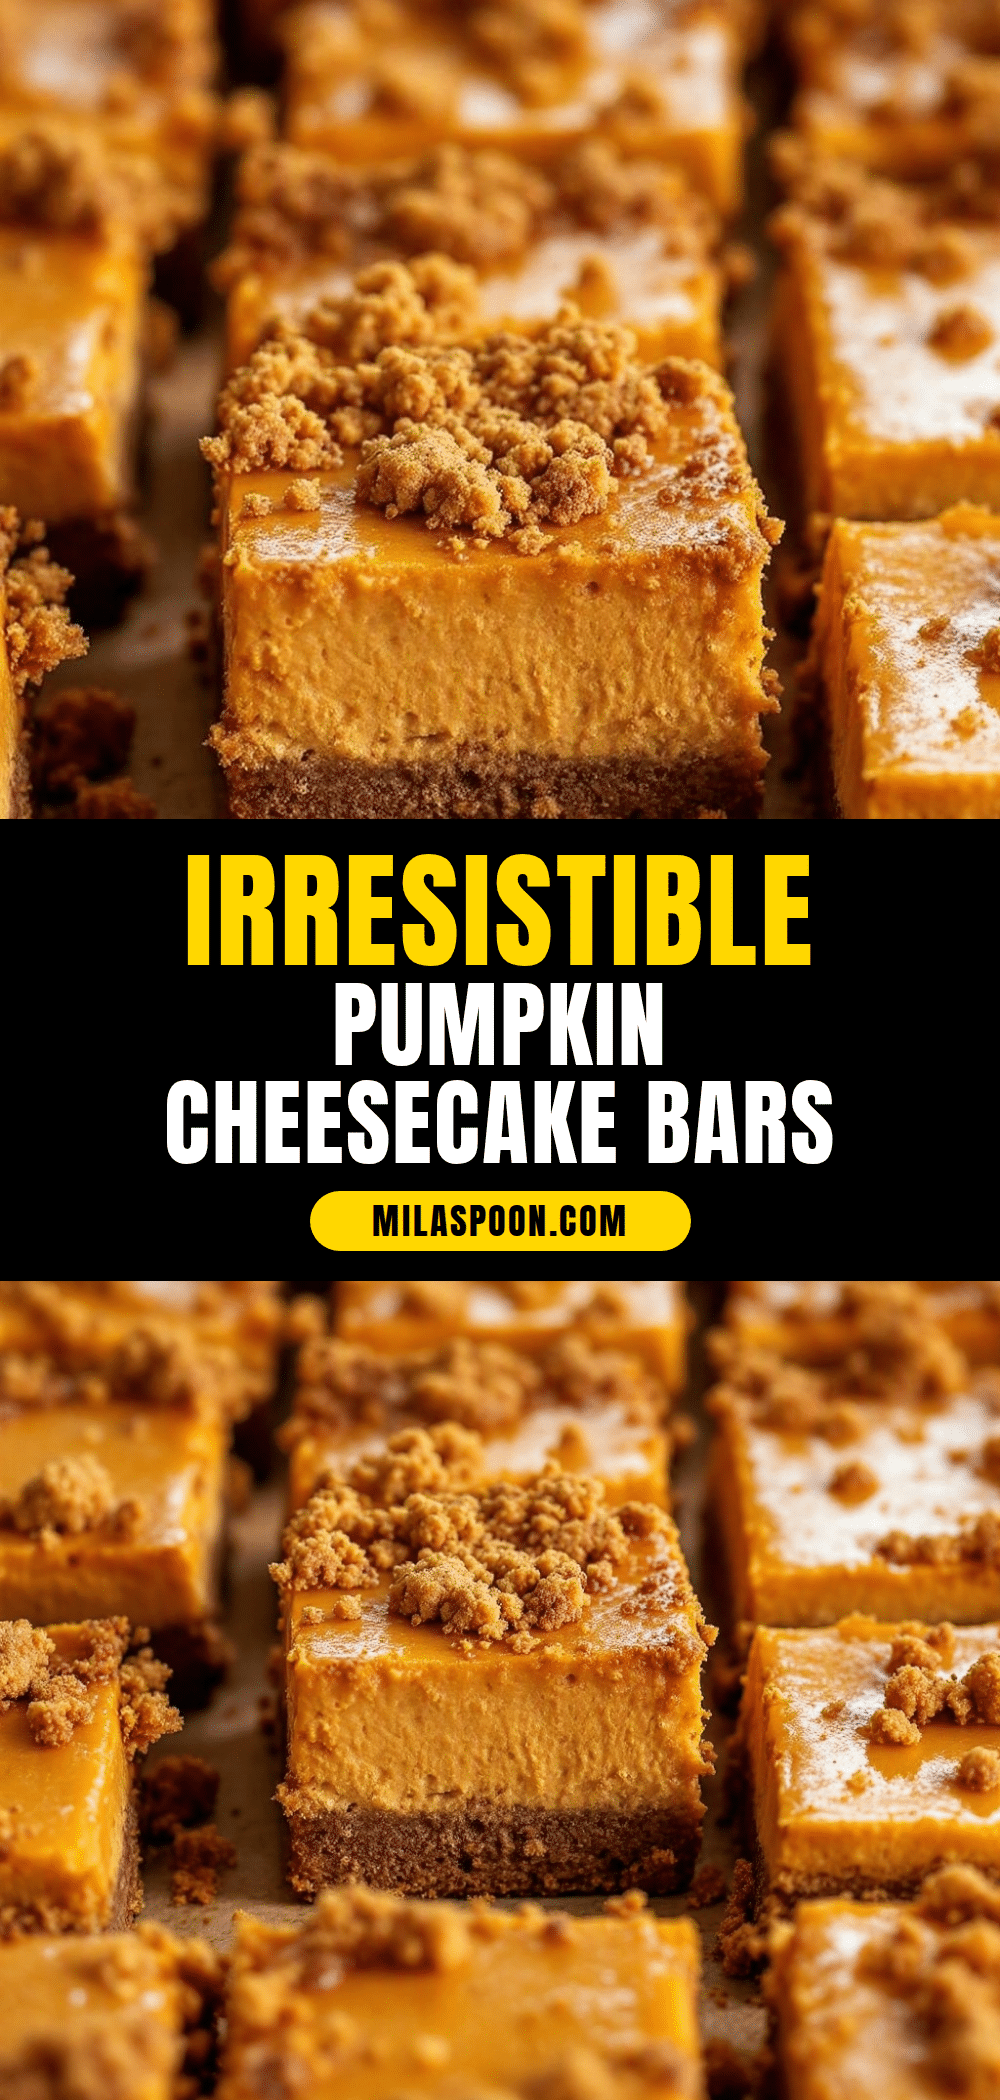
Perfect Pumpkin Cheesecake Bars: Easy Fall Dessert
These pumpkin cheesecake bars feature a crunchy gingersnap crust and a silky smooth pumpkin cheesecake filling. They’re the perfect fall dessert that’s easy to make and always a crowd-pleaser.
- Prep Time: 45 minutes
- Cook Time: 35-40 minutes
- Total Time: 5 hours 25 minutes (including chilling)
- Yield: 16 servings 1x
- Category: Dessert
- Cuisine: American
Ingredients
- 2 cups (about 200g) gingersnap cookie crumbs
- 5 tablespoons (70g) unsalted butter, melted
- 2 tablespoons (25g) granulated sugar
- 1/4 teaspoon salt
- 16 ounces (450g) cream cheese, softened to room temperature
- 3/4 cup (150g) granulated sugar
- 1/4 cup (50g) light brown sugar, packed
- 3 large eggs, room temperature
- 1 cup (245g) pumpkin puree
- 1/4 cup (60ml) sour cream, room temperature
- 1 teaspoon vanilla extract
- 1 1/2 teaspoons pumpkin pie spice
- 1/2 teaspoon ground cinnamon
- 1/4 teaspoon salt
- 1/2 cup (120ml) heavy cream (optional topping)
- 1 tablespoon powdered sugar (optional topping)
- 1/4 teaspoon vanilla extract (optional topping)
- Caramel sauce for drizzling (optional topping)
Instructions
- Preheat your oven to 350°F (175°C). Line a 9×9-inch baking pan with parchment paper, leaving a 2-inch overhang on two opposite sides. Lightly spray the parchment with non-stick cooking spray.
- Pulse the gingersnaps in a food processor until you have fine, uniform crumbs. Transfer to a medium bowl, add the sugar and salt, and stir to combine. Pour the melted butter over the crumb mixture and stir with a fork until every crumb is moistened. Press the mixture firmly into the prepared pan using the bottom of a measuring cup. Bake for 10 minutes. Set aside to cool.
- In a large mixing bowl, beat the softened cream cheese with an electric mixer on medium speed until smooth and creamy, about 2 minutes. Scrape down the sides and bottom of the bowl. Add the granulated sugar and brown sugar, and beat until well combined, another 2 minutes.
- Add the eggs one at a time, beating on low speed after each addition until just combined. Add the pumpkin puree, sour cream, and vanilla extract. Beat on low speed until smooth. Add the pumpkin pie spice, cinnamon, and salt, and mix until just combined.
- Pour the filling over the pre-baked crust. Use an offset spatula or the back of a spoon to spread it evenly. Tap the pan gently on the counter a few times to release any air bubbles.
- Bake at 350°F (175°C) for 35-40 minutes. The edges should be set and slightly puffed, but the center should still jiggle slightly when you gently shake the pan.
- Place the pan on a wire rack and let it cool to room temperature, about 1 hour. Once cool, cover the pan with plastic wrap and refrigerate for at least 4 hours, preferably overnight.
- When ready to serve, lift the bars out of the pan using the parchment handles. Place on a cutting board and slice into 16 squares. For clean slices, wipe the knife clean between each cut.
- If adding the whipped cream topping, whip the heavy cream, powdered sugar, and vanilla together until soft peaks form. Dollop or pipe onto each bar, and drizzle with caramel sauce if desired.
Notes
Room temperature ingredients are crucial for a smooth batter. Don’t overbeat the eggs to avoid cracks. The bars need at least 4 hours to set properly; overnight is best. For gluten-free, use gluten-free gingersnaps. For dairy-free, use dairy-free cream cheese and coconut cream.
Nutrition
- Serving Size: 1 bar
- Calories: 285
- Sugar: 20
- Sodium: 220
- Fat: 18
- Saturated Fat: 10
- Carbohydrates: 28
- Fiber: 1
- Protein: 5
Keywords: pumpkin cheesecake bars, gingersnap crust, fall dessert, pumpkin dessert, cheesecake bars, easy pumpkin recipe