Love this? Save it for later!
Share the inspiration with your friends
The other day, I was waiting in line at the grocery store when a sudden burst of cool sweetness hit me — the unmistakable scent of fresh berries mingled with something creamy and tangy. Honestly, it was like being whisked back to the summer I was ten, sitting cross-legged on the sun-warmed porch of my childhood friend Maya’s house. She had just pulled out her famous creamy no-bake flag cheesecake, the one she made every Fourth of July. The porch was scattered with picnic blankets, and the hum of cicadas filled the air as we all eagerly awaited that first slice.
That cracked ceramic plate she served it on, chipped on the edges, still feels vivid in my mind. I remember juggling the cheesecake and a glass of lemonade, missing a bit of the crust on my shirt because my hands were too full. Maybe you’ve been there — that jumble of excitement and mess that comes with savoring a summer treat that feels both simple and special.
Since then, I’ve tried to chase that exact feeling with my own take on the creamy no-bake flag cheesecake with fresh berries. It’s not just about the dessert itself, but the way the cool, velvety cream cheese filling contrasts with the tart pop of ripe strawberries and blueberries arranged like a flag on top. This recipe is my way of holding onto that fleeting moment of childhood joy — and honestly, it keeps me coming back every summer.
Why You’ll Love This Recipe
This creamy no-bake flag cheesecake recipe is a keeper, and let me tell you why I keep making it (and why you might want to too):
- Quick & Easy: Comes together in under 30 minutes, perfect for busy summer days or last-minute gatherings.
- Simple Ingredients: No need for fancy trips — most of this is pantry and fridge staples. You probably have everything on hand already.
- Perfect for Patriotic Celebrations: Whether it’s the Fourth of July, Memorial Day, or just a sunny weekend, this cheesecake shines as a festive centerpiece.
- Crowd-Pleaser: Kids love picking off the berries, and adults appreciate how light and creamy the filling is — it’s a win-win.
- Unbelievably Delicious: The silky cream cheese base with just the right touch of sweetness balances perfectly with the fresh berries’ brightness.
What sets this cheesecake apart from others is the no-bake approach combined with a fresh berry flag design that’s as eye-catching as it is tasty. I’ve tested it several times (including with a last-minute power outage once, which was a mess but turned out fine!), and the texture always comes out smooth and creamy without any cracks. It’s the kind of dessert that makes you close your eyes after the first bite — pure, simple comfort with a fun twist.
What Ingredients You Will Need
This recipe uses straightforward, wholesome ingredients that come together to create a bold flavor and a satisfying texture without fuss. Most are pantry staples, with fresh berries adding that seasonal pop.
- For the crust:
- 1 ½ cups (150g) graham cracker crumbs (I prefer Honey Maid for the best texture)
- 6 tablespoons (85g) unsalted butter, melted (adds richness and holds crumb together)
- 2 tablespoons granulated sugar (optional, for a touch of sweetness)
- For the creamy filling:
- 16 oz (450g) cream cheese, softened (room temperature for smoothest mix)
- 1 cup (240ml) heavy whipping cream, cold (whipped to soft peaks)
- ¾ cup (90g) powdered sugar (sifted to avoid lumps)
- 1 teaspoon pure vanilla extract (real vanilla makes a difference here)
- 1 tablespoon lemon juice (brightens the flavor)
- For the flag topping:
- 1 cup (150g) fresh strawberries, hulled and sliced (choose firm, ripe berries)
- 1 cup (150g) fresh blueberries (washed and dried carefully)
If fresh berries aren’t in season, frozen can work — just thaw and pat dry to avoid excess moisture. For a gluten-free crust, swap graham crackers with almond flour or gluten-free cookie crumbs. I’ve even tried this with coconut yogurt instead of cream cheese for a dairy-free twist, though the texture shifts a bit.
Equipment Needed
- 9-inch (23cm) springform pan — makes releasing the cheesecake easy without mess
- Electric mixer or stand mixer with whisk attachment — for smooth, fluffy filling
- Mixing bowls — at least two, one for crust, one for filling
- Spatula — flexible to scrape down sides and smooth the cheesecake surface
- Measuring cups and spoons — for accuracy
- Optional: Food processor — handy for crushing graham crackers quickly, but a rolling pin and zip bag work too
I’ve used both a handheld mixer and a stand mixer for this cheesecake, and honestly, the stand mixer speeds things up and gives you that perfectly whipped cream. If you’re on a budget, a sturdy whisk and some elbow grease will do the job fine, just expect a bit more arm workout. To keep the springform pan in good shape, I wipe it clean right after use and avoid abrasive scrubbers.
Preparation Method
- Prepare the crust (10 minutes): Start by crushing 1 ½ cups (150g) graham crackers into fine crumbs. If you don’t have a food processor, place them in a zip-top bag and crush with a rolling pin until finely ground. Mix the crumbs with 6 tablespoons (85g) melted unsalted butter and 2 tablespoons sugar (optional) until evenly combined. Press this mixture firmly into the bottom of your 9-inch (23cm) springform pan. Use the bottom of a flat glass or measuring cup to compact the crust tightly. Chill in the fridge for at least 15 minutes to set.
- Make the filling (15 minutes): While the crust chills, beat 16 oz (450g) softened cream cheese in a large bowl until smooth and creamy. Add ¾ cup (90g) powdered sugar, 1 teaspoon vanilla extract, and 1 tablespoon lemon juice. Beat again until fully incorporated. In a separate chilled bowl, whip 1 cup (240ml) cold heavy cream to soft peaks using an electric mixer. Gently fold the whipped cream into the cream cheese mixture using a spatula, being careful not to deflate the air you just whipped in. This folding step is crucial for that light, creamy texture.
- Assemble and chill (5 minutes prep + 4 hours chill): Pour the filling over the chilled crust and smooth the top evenly with your spatula. Cover tightly with plastic wrap and refrigerate for at least 4 hours, preferably overnight, to allow it to set properly.
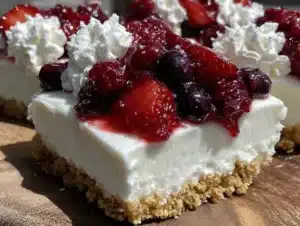
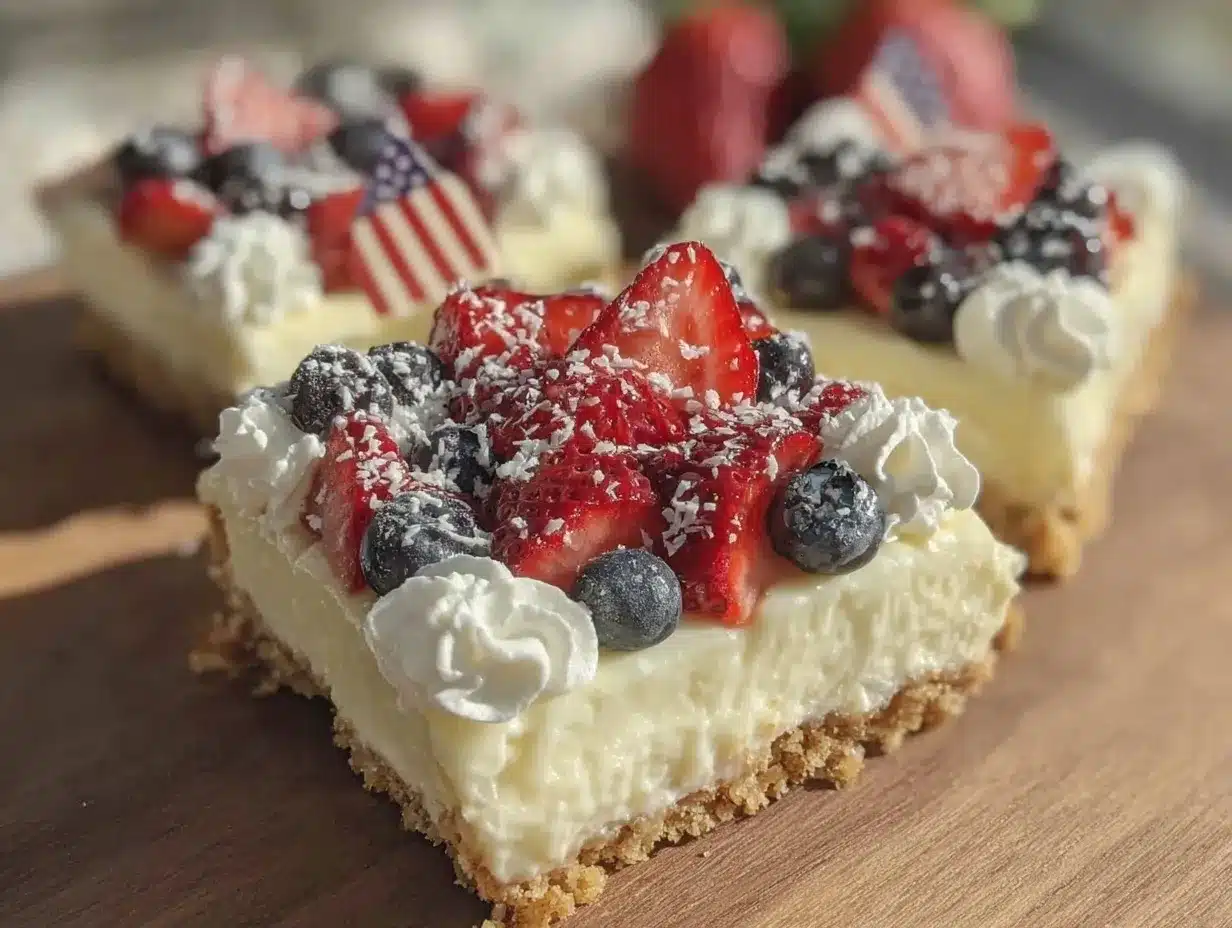
- Decorate the flag (10 minutes): Just before serving, arrange the fresh strawberries and blueberries on top of the cheesecake to mimic the American flag. Place blueberries in the upper left corner in a square or rectangle shape, then line up sliced strawberries in rows to the right and below. Don’t worry if it’s not perfect — that homemade charm is part of the appeal!
If you find the filling a bit soft after chilling, a quick tip is to pop the cheesecake in the freezer for 15 minutes before serving to firm it up slightly. Also, always use cold cream for whipping — it whips faster and holds shape better. I learned that the hard way once, trying to whip cream straight from the fridge door; it just wouldn’t thicken properly.
Cooking Tips & Techniques
One trick I swear by is making sure your cream cheese is truly at room temperature before mixing. Cold cream cheese leads to a lumpy filling, and honestly, no one wants to bite into a cheesecake that feels grainy. Let it sit out for about 30 minutes or microwave for 10 seconds if you’re in a rush (just don’t melt it).
When folding whipped cream into the cream cheese mixture, think gentle but thorough. I like using a wide spatula and cutting through the center, scooping around the sides, and turning the bowl slowly. This keeps the air trapped in the cream and gives you that dreamy texture.
Don’t skip chilling the crust before adding the filling — it helps the crust hold together instead of getting soggy. And when it comes to arranging the berries, try to pick firm, ripe ones that hold their shape. Mushy berries can release too much juice and make the topping runny.
From personal experience, rushing the chilling time is a common mistake. I once tried to serve it after just an hour in the fridge, and the cheesecake was more like a cream mess than a firm slice. Patience really pays off here.
Variations & Adaptations
- Dairy-Free Version: Swap cream cheese with a dairy-free cream cheese alternative and use coconut cream instead of heavy cream. The texture changes slightly but stays creamy.
- Berry Mix-Up: Change the berry topping seasonally — raspberries and blackberries make a beautiful flag alternative, or mix in sliced kiwi for a tropical twist.
- Chocolate Crust: Use crushed chocolate cookies instead of graham crackers for a richer crust that pairs beautifully with the creamy filling and berries.
- Mini Cheesecakes: Make individual portions in a muffin tin with cupcake liners for easy serving at parties.
I once tried adding a swirl of homemade strawberry jam into the filling before chilling — it was a happy accident that gave the cheesecake a subtle fruity surprise inside. Totally worth trying if you want to surprise guests.
Serving & Storage Suggestions
This cheesecake is best served chilled, straight from the fridge, so the creamy filling is firm but still soft enough to cut cleanly. I like to serve it with a light drizzle of honey or a dusting of powdered sugar for a little extra flair.
Pair it with a sparkling lemonade or iced tea for a refreshing summer combo. It’s also lovely alongside a scoop of vanilla bean ice cream if you want to go all out.
Store leftover cheesecake covered tightly in the fridge for up to 4 days. If you want to freeze it, wrap it well with plastic wrap and aluminum foil, and it should keep for up to 1 month. Thaw overnight in the fridge before serving.
Over time, the berry juices may seep a little into the filling, adding a natural fruity tint and extra flavor depth — so don’t worry if the flag looks a bit juicier after a day or two. It only tastes better.
Nutritional Information & Benefits
Each slice (assuming 12 servings) contains approximately:
| Calories | 280 |
|---|---|
| Fat | 20g |
| Carbohydrates | 18g |
| Protein | 4g |
| Sugar | 12g |
The cream cheese provides a good source of calcium and protein, while the berries are packed with antioxidants and vitamin C. This recipe is naturally gluten-free if you choose gluten-free graham crackers or alternative crusts. It’s a moderately indulgent treat but with fresh fruit, it feels lighter and more balanced than many traditional cheesecakes.
From a wellness point of view, I appreciate how this dessert satisfies sweet cravings without relying on heavy baking or added artificial ingredients. It’s a win for those who want a homemade dessert sans the fuss.
Conclusion
This creamy no-bake flag cheesecake with fresh berries is a recipe that’s both easy to make and hard to forget. It brings together simple ingredients in a way that captures a moment — that cool, sweet, summery feeling you might be chasing yourself. I love how it turns any gathering into a celebration without stress or complicated steps.
Feel free to tweak the berry arrangement or try one of the variations to make it your own. Honestly, there’s something magical about a dessert you can customize to your taste and still get rave reviews.
Give this cheesecake a try and let me know how it goes — I’m always curious about new berry combos or crust ideas that readers like you come up with. Trust me, once you make this, it’ll become your go-to dessert for sunny days and special moments alike.
FAQs
Can I make this cheesecake ahead of time?
Absolutely! It actually tastes better after chilling overnight, which gives the filling time to set perfectly.
What if I don’t have a springform pan?
You can use a regular cake pan lined with parchment paper for easier removal, but the springform pan makes it much simpler to release the cheesecake without damage.
Can I use frozen berries for the topping?
Yes, but make sure to thaw and drain them well to avoid excess moisture that can make the topping runny.
How do I keep the crust from getting soggy?
Chilling the crust before adding the filling helps it firm up. Also, pressing the crust tightly into the pan prevents crumbling.
Is it possible to make this cheesecake vegan?
With dairy-free cream cheese and coconut cream, plus a vegan crust option, you can make it vegan, though the texture and flavor will be slightly different.
Pin This Recipe!

Creamy No-Bake Flag Cheesecake Recipe Easy Step-by-Step with Fresh Berries

A creamy no-bake cheesecake featuring a smooth cream cheese filling topped with fresh strawberries and blueberries arranged like a flag. Perfect for patriotic celebrations and summer gatherings.
- Prep Time: 30 minutes
- Cook Time: 0 minutes
- Total Time: 4 hours 30 minutes
- Yield: 12 servings 1x
- Category: Dessert
- Cuisine: American
Ingredients
- 1 ½ cups (150g) graham cracker crumbs
- 6 tablespoons (85g) unsalted butter, melted
- 2 tablespoons granulated sugar (optional)
- 16 oz (450g) cream cheese, softened
- 1 cup (240ml) heavy whipping cream, cold
- ¾ cup (90g) powdered sugar
- 1 teaspoon pure vanilla extract
- 1 tablespoon lemon juice
- 1 cup (150g) fresh strawberries, hulled and sliced
- 1 cup (150g) fresh blueberries
Instructions
- Prepare the crust (10 minutes): Crush graham crackers into fine crumbs using a food processor or rolling pin in a zip-top bag. Mix crumbs with melted butter and sugar until combined. Press firmly into the bottom of a 9-inch springform pan. Chill in fridge for at least 15 minutes.
- Make the filling (15 minutes): Beat softened cream cheese until smooth. Add powdered sugar, vanilla extract, and lemon juice; beat until incorporated. Whip cold heavy cream to soft peaks in a separate chilled bowl. Gently fold whipped cream into cream cheese mixture without deflating.
- Assemble and chill (5 minutes prep + 4 hours chill): Pour filling over chilled crust and smooth top. Cover with plastic wrap and refrigerate for at least 4 hours or overnight.
- Decorate the flag (10 minutes): Arrange strawberries and blueberries on top to mimic the American flag, placing blueberries in the upper left corner and strawberries in rows to the right and below.
Notes
Use room temperature cream cheese for smooth filling. Whip cold cream for best results. Chill crust before adding filling to prevent sogginess. If filling is too soft after chilling, freeze for 15 minutes before serving. Frozen berries can be used if thawed and patted dry. Variations include dairy-free, chocolate crust, and mini cheesecakes.
Nutrition
- Serving Size: 1 slice (1/12th of c
- Calories: 280
- Sugar: 12
- Fat: 20
- Carbohydrates: 18
- Protein: 4
Keywords: no-bake cheesecake, flag cheesecake, patriotic dessert, fresh berries, summer dessert, easy cheesecake, Fourth of July dessert