Love this? Save it for later!
Share the inspiration with your friends
“Mom, can we make the creepy brownies again this year?” My seven-year-old didn’t even look up from his homework when he asked. And just like that, our Halloween baking tradition was set in stone for another season. I remember the first time I made these Spooky Fudgy Spider Web Brownie Bites—it was a total accident, honestly. I had a batch of brownies cooling on the counter and a tube of white frosting staring at me from the fridge. My son grabbed a toothpick, dipped it in the frosting, and started doodling. The result? A messy, beautiful spider web that looked way cooler than anything I could have planned. Now, every October, we sit at that same counter and create our little web-covered masterpieces. It’s messy, it’s fun, and the brownies? They’re ridiculously fudgy.
These aren’t just any brownie bites. They’re dense, rich, and almost truffle-like in the center—exactly the kind of brownie that makes you close your eyes after the first bite. And the spider web design? It’s deceptively simple. You don’t need a pastry bag or any fancy tools. Just a toothpick and a steady hand (or your kid’s wobbly one—it adds character). Whether you’re hosting a Halloween party, sending treats to school, or just want something spooky but sweet to snack on while watching Hocus Pocus for the hundredth time, these little bites deliver. They’re the kind of recipe that feels special without being stressful. And honestly, that’s my favorite kind of baking.
Why You’ll Love These Spooky Fudgy Spider Web Brownie Bites
Let me tell you why this recipe has become our family’s Halloween MVP. It’s not just about how they look—though, let’s be real, the spider web design is pretty adorable. It’s about how easy they are to pull off when you’re juggling costumes, candy, and chaos.
Quick & Easy: From start to finish, you’re looking at about 35 minutes. The brownies bake up fast in a mini muffin tin, and the decorating takes maybe five minutes. Perfect for those “I forgot I need a Halloween treat” moments.
Simple Ingredients: You probably have everything in your pantry right now. Butter, sugar, eggs, cocoa powder, flour—the usual suspects. No weird specialty ingredients or trips to three different stores.
Perfect for Halloween Parties: These bites are bite-sized, which means they’re great for buffets, classroom treats, or just grazing while the kids run around in their costumes. They also travel well, so you can bring them to a potluck without stress.
Crowd-Pleaser: I’ve made these for Halloween gatherings, school events, and even a grown-up dinner party (I just made the webs a little neater). Kids love the design, and adults love how fudgy they are. It’s a win-win.
Unbelievably Delicious: The texture is what sets these apart. They’re not cakey or dry—they’re dense, moist, and intensely chocolatey. The white chocolate spider web adds a subtle sweetness that balances the rich cocoa. Honestly, I’ve caught myself eating them plain, without the web, just because they’re that good.
What makes this recipe different from the rest? It’s the technique. I use melted butter and a slightly higher ratio of butter to flour, which gives these bites that fudgy, almost brownie-cookie hybrid texture. Plus, the mini muffin tin creates the perfect ratio of edge to center—crispy edges, gooey middle. It’s not just another brownie recipe. It’s the one.
And here’s the emotional hook: this recipe isn’t just about the food. It’s about the moment. The way my son’s face lights up when he draws his webs. The way we laugh when one of them turns out looking more like a tangled fishing net than a spider web. These brownie bites are a little tradition wrapped in chocolate. And that’s the kind of recipe worth making.
What Ingredients You Will Need
This recipe uses simple, everyday ingredients to create something that feels special. You don’t need to hunt down anything fancy—just good, basic baking staples that work together to deliver that perfect fudgy texture.
For the Brownie Bites:
- 1/2 cup (1 stick) unsalted butter – Melted and slightly cooled. I use Land O’Lakes because it has a consistent fat content, but any good-quality unsalted butter works. The butter is what gives these bites their rich, tender crumb.
- 3/4 cup granulated sugar – Adds sweetness and helps create that crackly top. Don’t reduce the sugar—it’s essential for texture.
- 2 large eggs – Room temperature is best. Cold eggs can seize the melted butter, so let them sit out for 15 minutes before you start.
- 1 teaspoon vanilla extract – Pure vanilla extract adds depth. Skip the imitation stuff if you can.
- 1/2 cup unsweetened cocoa powder – I prefer Dutch-process cocoa for a darker, richer flavor, but natural cocoa works too. If you use natural cocoa, the brownies will be a bit lighter in color but still delicious.
- 1/2 cup all-purpose flour – Spoon and level it—don’t scoop directly from the bag or you’ll pack in too much flour and end up with dry brownies.
- 1/4 teaspoon salt – Enhances the chocolate flavor. I use fine sea salt.
- 1/4 teaspoon baking powder – Just enough to give them a tiny lift without making them cakey.
For the Spider Web Decoration:
- 1/4 cup white chocolate chips or melting wafers – Ghirardelli white chocolate chips melt beautifully and have a nice creamy flavor. You can also use Wilton candy melts if you want a brighter white.
- 1 teaspoon coconut oil or vegetable shortening – This helps the white chocolate melt smoothly and gives it the right consistency for drizzling. Don’t skip it—white chocolate can be finicky.
- Optional: Candy spider rings – These are purely for fun. I find them at the grocery store in the baking aisle around Halloween. My son insists on putting one on each brownie bite.
Substitution Guidance: If you want to make these gluten-free, swap the all-purpose flour with a 1:1 gluten-free baking flour blend. I’ve used Bob’s Red Mill with great results. For a dairy-free version, use vegan butter and dairy-free white chocolate chips. The texture will be slightly different, but still delicious. And if you don’t have white chocolate, you can use a simple powdered sugar glaze instead—just mix 1/2 cup powdered sugar with 1 tablespoon milk until smooth, then drizzle.
Equipment Needed
You don’t need a fancy kitchen to make these brownie bites. Here’s what you’ll need:
- Mini muffin tin – This is essential. A standard 24-cup mini muffin tin works perfectly. If you don’t have one, you can use a regular muffin tin, but you’ll need to adjust the baking time (add about 5-7 minutes).
- Non-stick cooking spray or paper liners – I prefer spray for these because it gives the brownies a slightly crispy edge. If you use liners, go with mini parchment liners for a cleaner look.
- Medium mixing bowl – For the wet ingredients.
- Small mixing bowl – For the dry ingredients.
- Whisk – A good whisk helps incorporate the eggs without overmixing.
- Rubber spatula – For folding the dry ingredients into the wet.
- Cookie scoop or small spoon – For portioning the batter into the muffin cups. A 1-tablespoon scoop is ideal.
- Toothpick or skewer – This is your spider web tool. A wooden toothpick works great. You can also use a cake tester or a thin skewer.
- Small piping bag or zip-top bag – For the white chocolate. A zip-top bag with the corner snipped off works just as well as a piping bag.
- Cooling rack – Letting the brownies cool completely before decorating is crucial. A wire rack speeds up the process.
I’ve made these with a cheap mini muffin tin from the dollar store, and they turned out fine. You don’t need expensive equipment. Just make sure your tin is non-stick and you spray it well—brownies love to stick.
Preparation Method
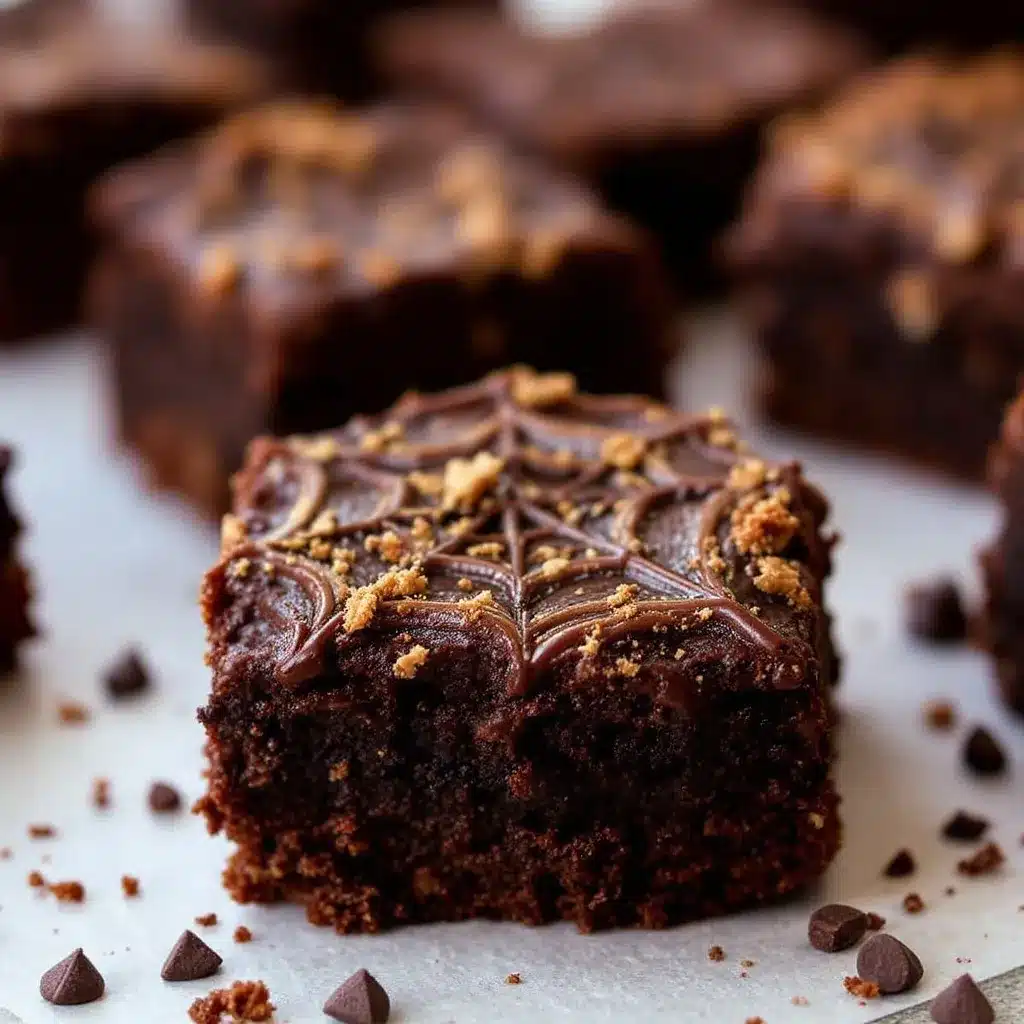
Ready to make some magic? Let’s walk through this step by step. I promise it’s easier than it looks.
Step 1: Preheat and Prep
Preheat your oven to 350°F (175°C). Spray your mini muffin tin generously with non-stick cooking spray. Don’t be shy—brownies are sticky. If you’re using liners, place them in the cups now. Set the tin aside.
Step 2: Melt the Butter
In a medium microwave-safe bowl, melt the butter in 30-second intervals, stirring between each, until fully melted. Let it cool for about 2 minutes—you don’t want it hot enough to cook the eggs. The butter should be warm but not steaming.
Step 3: Mix the Wet Ingredients
Add the granulated sugar to the melted butter and whisk until combined. It will look a bit grainy, and that’s fine. Add the eggs one at a time, whisking well after each addition. The mixture should be smooth and glossy. Stir in the vanilla extract. Take a moment to smell it—that buttery, vanilla scent is the best part of baking.
Step 4: Combine the Dry Ingredients
In a small bowl, whisk together the cocoa powder, flour, salt, and baking powder. Make sure there are no lumps. Cocoa powder can be clumpy, so give it a good whisk.
Step 5: Fold It All Together
Pour the dry ingredients into the wet ingredients. Use a rubber spatula to fold gently until just combined. Do not overmix—you want to see the last streaks of flour disappear, then stop. Overmixing develops gluten and makes brownies tough. The batter will be thick and fudgy, almost like a soft cookie dough.
Step 6: Fill the Muffin Cups
Using a cookie scoop or a small spoon, drop about 1 tablespoon of batter into each mini muffin cup. The cups should be about 3/4 full. Don’t overfill—these brownies puff up slightly as they bake. If you have extra batter, you can bake a second batch once the first one is done.
Step 7: Bake
Bake for 10-12 minutes. The edges should look set and slightly crackly, but the centers will still look a little soft. That’s exactly what you want—they’ll continue to set as they cool. A toothpick inserted into the center should come out with a few moist crumbs, not raw batter. If it comes out clean, they’re overbaked. Watch them closely; ovens vary, and these can go from perfect to dry in 60 seconds.
Step 8: Cool Completely
Let the brownie bites cool in the pan for 5 minutes. Then, carefully remove them and transfer to a wire rack to cool completely. This is the hardest part—waiting. But trust me, if you try to decorate them while they’re warm, the white chocolate will melt into a puddle. Patience, my friend.
Step 9: Make the Spider Web Glaze
While the brownies cool, prepare the white chocolate. Place the white chocolate chips and coconut oil in a small microwave-safe bowl. Microwave in 20-second intervals, stirring after each, until smooth and fully melted. Be careful—white chocolate burns easily. If it seizes (turns grainy), add a tiny bit more coconut oil and stir vigorously.
Step 10: Decorate
Transfer the melted white chocolate to a small piping bag or a zip-top bag with a tiny corner snipped off. Working with one brownie at a time, pipe a small circle of white chocolate in the center. Then, pipe concentric circles around it, spacing them about 1/4 inch apart. You should have 3-4 circles total. Immediately, while the white chocolate is still wet, drag a toothpick from the center outward through all the circles. Repeat this 5-6 times around the brownie, like spokes on a wheel. Then, drag the toothpick from the outer edge back toward the center in between each spoke. You’ll see the web pattern emerge—it’s like magic. If you’re using candy spider rings, place one on top of each brownie while the chocolate is still wet.
Step 11: Let the Webs Set
Allow the white chocolate to set completely before serving. This takes about 15-20 minutes at room temperature, or you can pop them in the fridge for 5 minutes if you’re impatient (I won’t judge).
Cooking Tips & Techniques
I’ve made these brownie bites at least a dozen times, and I’ve learned a few things the hard way. Here are my best tips to ensure success.
Don’t Overbake. This is the number one mistake people make. Brownies are meant to be fudgy, not cakey. The second you see the edges set and the center still looks slightly underdone, pull them out. They’ll finish cooking from residual heat. Overbaked brownies are dry and crumbly—nobody wants that.
Use Room Temperature Eggs. Cold eggs can cause the melted butter to seize, creating a lumpy batter. If you forgot to take them out of the fridge, place them in a bowl of warm water for 5 minutes. It works every time.
Let the Brownies Cool Completely. I know it’s tempting to start decorating right away, but warm brownies will turn your beautiful spider web into a sad, melted mess. Give them at least 30 minutes on a wire rack. If you’re in a rush, pop them in the fridge for 10 minutes.
Work Quickly with the White Chocolate. Once you pipe the circles, you need to drag the toothpick through immediately. If the white chocolate starts to set, the web won’t form properly. Work with one brownie at a time, and don’t pipe all the circles at once.
Practice on a Plate First. If you’re nervous about the spider web design, practice on a plate or a piece of parchment paper. It takes a couple tries to get the hang of it, but once you do, it’s incredibly satisfying.
Clean Your Toothpick Between Brownies. The white chocolate will build up on the toothpick, which can ruin the clean lines of your web. Wipe it off with a paper towel between each brownie.
I once tried to make these for a Halloween party and forgot to spray the muffin tin. Let’s just say I spent 20 minutes chiseling brownie bits out of the pan. Learn from my mistakes—spray generously.
Variations & Adaptations
One of the best things about this recipe is how easy it is to customize. Here are some of my favorite variations.
Peanut Butter Spider Webs: Swap the white chocolate for melted peanut butter. It’s not as pretty, but the combination of chocolate and peanut butter is unbeatable. Just microwave 1/4 cup creamy peanut butter with 1 teaspoon coconut oil until smooth, then pipe as directed.
Ghostly White Chocolate Drizzle: Instead of spider webs, simply drizzle the melted white chocolate over the brownie bites in a zigzag pattern. Add two tiny dots for eyes, and you’ve got ghost brownies. My son loves this variation because it’s even easier.
Gluten-Free Version: Use a 1:1 gluten-free baking flour blend in place of all-purpose flour. I’ve tested this with Bob’s Red Mill, and the texture is almost identical. Just make sure your blend contains xanthan gum for structure.
Spooky Sprinkle Edition: Before the white chocolate sets, sprinkle the brownie bites with orange and black Halloween sprinkles. It adds a fun crunch and makes them look even more festive. I like using the little candy eyeballs for an extra creepy touch.
Dark Chocolate Webs: If you’re not a white chocolate fan, use dark chocolate chips instead. The contrast won’t be as stark, but it’s still beautiful. Melt 1/4 cup dark chocolate chips with 1 teaspoon coconut oil, then pipe as directed. The dark chocolate against the fudgy brownie is dangerously good.
I once tried adding a pinch of cayenne pepper to the brownie batter for a spicy kick. It was actually amazing—the heat paired perfectly with the rich chocolate. Just a tiny pinch, though. You want a whisper of heat, not a scream.
Serving & Storage Suggestions
These brownie bites are best served at room temperature. The fudgy texture softens slightly, and the white chocolate web stays firm but not hard. If you’ve stored them in the fridge, let them sit out for 10-15 minutes before serving.
For a Halloween party, arrange them on a platter lined with black or orange tissue paper. Add a few candy spiders or plastic spiders around the edges for a creepy effect. They also look great on a tiered stand, which gives the party table some height.
These pair beautifully with a cold glass of milk, a hot cup of coffee, or a scoop of vanilla ice cream. If you’re feeling extra indulgent, serve them alongside a bowl of cozy roasted tomato basil soup for a sweet-and-savory Halloween dinner. The contrast is surprisingly satisfying.
Storage: Store the brownie bites in an airtight container at room temperature for up to 3 days. If you stack them, place a piece of parchment paper between layers to prevent the spider webs from smudging. You can also store them in the fridge for up to a week, but the texture will be slightly firmer.
Freezing: These freeze beautifully. Place the undecorated brownie bites in a single layer on a baking sheet and freeze for 1 hour. Then transfer to a freezer-safe bag or container. They’ll keep for up to 3 months. When you’re ready to serve, thaw them at room temperature, then decorate with the spider webs. The white chocolate doesn’t freeze well, so always decorate after thawing.
The flavors actually deepen after a day or two. The brownies become even more fudgy and the chocolate flavor intensifies. So if you can resist eating them all on day one, you’re in for a treat on day two.
Nutritional Information & Benefits
Let’s be real—these are a treat, not a health food. But that doesn’t mean they’re without merit. Here’s a rough estimate per brownie bite (based on a batch of 24):
| Nutrient | Amount per Bite |
|---|---|
| Calories | 110 |
| Total Fat | 7g |
| Saturated Fat | 4g |
| Cholesterol | 30mg |
| Sodium | 50mg |
| Total Carbohydrates | 12g |
| Dietary Fiber | 1g |
| Sugars | 9g |
| Protein | 2g |
These values are approximate and will vary based on the exact ingredients you use. The good news? Each bite is small enough that you can enjoy one (or two) without derailing your day. The cocoa powder is rich in antioxidants, and the eggs provide a little protein. Plus, there’s something to be said for the joy of a homemade treat—it’s good for the soul.
If you’re watching your sugar intake, you can reduce the sugar to 1/2 cup, but the texture will be slightly less fudgy. For a lower-fat option, substitute half the butter with unsweetened applesauce. It won’t be as rich, but it will still be delicious.
These brownie bites are naturally nut-free (as long as you don’t add peanut butter), making them a safe option for school parties. They do contain dairy, eggs, and gluten, so keep that in mind if you’re serving a crowd with allergies.
Conclusion
These Spooky Fudgy Spider Web Brownie Bites are more than just a Halloween treat—they’re a little tradition waiting to happen. They’re easy enough for a weeknight baking session with the kids, but impressive enough to steal the show at a Halloween party. The fudgy, rich brownie base is everything you want in a chocolate dessert, and the spider web design adds a playful touch that never fails to get a smile.
I love this recipe because it’s forgiving. If your webs aren’t perfect, they still look amazing. If you eat three before you finish decorating, nobody’s counting. It’s the kind of baking that reminds you why you love being in the kitchen—not for perfection, but for the joy of creating something delicious with the people you love.
So go ahead, preheat that oven, and make a mess. Your Halloween table will thank you. And if you come up with your own twist on the spider web design, I want to hear about it. Drop a comment below and tell me how your brownies turned out—did your kids take over the decorating? Did you add sprinkles? Did you eat too many before the party started? I’ve done all of the above, and I promise, no judgment here.
Happy Halloween, friends. May your brownies be fudgy and your spider webs be spooky.
Frequently Asked Questions
Can I use a regular muffin tin instead of a mini muffin tin?
Yes, you can. Use a standard 12-cup muffin tin and fill each cup about 2/3 full. Bake for 18-22 minutes, or until a toothpick inserted into the center comes out with a few moist crumbs. The baking time will be longer because the brownies are thicker. You’ll get about 8-10 regular-sized brownies.
Why did my spider web design turn out messy?
A few things could be at play. First, make sure the white chocolate is smooth and fluid—if it’s too thick, it won’t spread properly. Second, work quickly after piping the circles. The white chocolate starts to set almost immediately, and if it’s too firm, the toothpick won’t drag cleanly. Finally, wipe your toothpick between each brownie to prevent buildup.
Can I make these brownie bites ahead of time?
Absolutely. Bake the brownie bites up to 2 days in advance and store them in an airtight container at room temperature. Decorate them the day you plan to serve them for the best-looking spider webs. If you need to make them further ahead, freeze the undecorated brownies for up to 3 months, then thaw and decorate.
How do I prevent the brownies from sticking to the pan?
Generously spray the mini muffin tin with non-stick cooking spray, making sure to get the sides and the bottom of each cup. You can also use mini parchment liners for guaranteed non-stick results. If you’re using spray, let the brownies cool in the pan for exactly 5 minutes before removing—any longer and they’ll stick.
Can I use a different type of chocolate for the spider web?
Yes! Dark chocolate, milk chocolate, or even colored candy melts work great. Just keep in mind that dark chocolate will be less visible against the dark brownie, so you might want to use a light-colored background. You can also use a simple powdered sugar glaze (mix 1/2 cup powdered sugar with 1 tablespoon milk) for a white web without the fuss of melting chocolate.
Pin This Recipe!

Spooky Fudgy Spider Web Brownie Bites – Easy Halloween Treat
These dense, fudgy brownie bites are topped with a simple white chocolate spider web design, making them the perfect Halloween treat. Quick to make and fun to decorate, they’re a family-friendly recipe that’s sure to be a hit at any spooky gathering.
- Prep Time: 15 minutes
- Cook Time: 12 minutes
- Total Time: 35 minutes
- Yield: 24 servings 1x
- Category: Dessert
- Cuisine: American
Ingredients
- 1/2 cup (1 stick) unsalted butter, melted and slightly cooled
- 3/4 cup granulated sugar
- 2 large eggs, room temperature
- 1 teaspoon vanilla extract
- 1/2 cup unsweetened cocoa powder (Dutch-process preferred)
- 1/2 cup all-purpose flour, spooned and leveled
- 1/4 teaspoon salt
- 1/4 teaspoon baking powder
- 1/4 cup white chocolate chips or melting wafers
- 1 teaspoon coconut oil or vegetable shortening
- Optional: candy spider rings for decoration
Instructions
- Preheat oven to 350°F (175°C). Generously spray a 24-cup mini muffin tin with non-stick cooking spray or line with mini parchment liners.
- In a medium microwave-safe bowl, melt the butter in 30-second intervals, stirring between each, until fully melted. Let cool for about 2 minutes.
- Add the granulated sugar to the melted butter and whisk until combined. Add the eggs one at a time, whisking well after each addition. Stir in the vanilla extract.
- In a small bowl, whisk together the cocoa powder, flour, salt, and baking powder until no lumps remain.
- Pour the dry ingredients into the wet ingredients. Use a rubber spatula to fold gently until just combined. Do not overmix.
- Using a cookie scoop or small spoon, drop about 1 tablespoon of batter into each mini muffin cup, filling about 3/4 full.
- Bake for 10-12 minutes, until the edges are set and slightly crackly but the centers still look soft. A toothpick inserted into the center should come out with a few moist crumbs.
- Let the brownie bites cool in the pan for 5 minutes, then transfer to a wire rack to cool completely (about 30 minutes).
- While the brownies cool, prepare the white chocolate glaze. Place the white chocolate chips and coconut oil in a small microwave-safe bowl. Microwave in 20-second intervals, stirring after each, until smooth and fully melted.
- Transfer the melted white chocolate to a small piping bag or a zip-top bag with a tiny corner snipped off. Working with one brownie at a time, pipe a small circle of white chocolate in the center, then pipe 3-4 concentric circles around it, spacing about 1/4 inch apart.
- Immediately, while the white chocolate is still wet, drag a toothpick from the center outward through all the circles. Repeat 5-6 times around the brownie like spokes on a wheel. Then drag the toothpick from the outer edge back toward the center between each spoke to create the web pattern.
- If using candy spider rings, place one on top of each brownie while the chocolate is still wet. Let the white chocolate set completely (15-20 minutes at room temperature or 5 minutes in the fridge) before serving.
Notes
Do not overbake; brownies should be slightly soft in the center when removed from the oven. Use room temperature eggs to prevent the butter from seizing. Let brownies cool completely before decorating to prevent the white chocolate from melting. Work quickly with the white chocolate; if it starts to set, the web pattern won’t form properly. Clean the toothpick between each brownie for clean lines. For gluten-free, use a 1:1 gluten-free baking flour blend. For dairy-free, use vegan butter and dairy-free white chocolate chips.
Nutrition
- Serving Size: 1 brownie bite
- Calories: 110
- Sugar: 9
- Sodium: 50
- Fat: 7
- Saturated Fat: 4
- Carbohydrates: 12
- Fiber: 1
- Protein: 2
Keywords: Halloween brownies, spider web brownies, fudgy brownie bites, easy Halloween treat, chocolate brownies, white chocolate spider web, kid-friendly Halloween dessert


